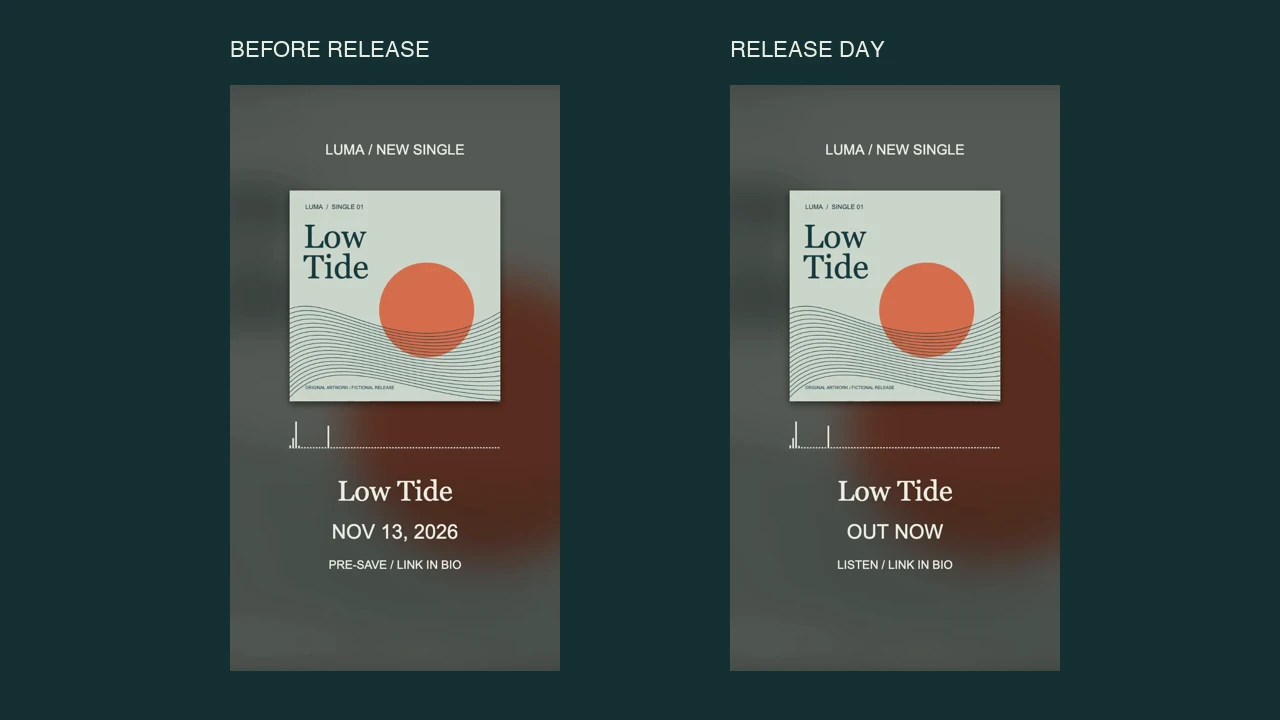
A single release announcement video combines a memorable section of your song with the artist name, track title, cover artwork, and a clear next action. Before release, show the confirmed date and a pre-save prompt. Once the song is available, change the message to Out now and direct people to listen.
In VisualizerWave, load the finished track, choose a vertical canvas, add artwork and release text, select the song section, and export the clip. Keep the release information visible from the first frame so the announcement still makes sense before someone turns on the sound.
One design, two announcement messages
Actual VisualizerWave export: six seconds, 720 × 1280, 30 fps. Luma and Low Tide are a fictional release with original artwork. The bars use analysis of a private diagnostic recording; this public animation contains no audio track.
The artwork introduces the release, the small spectrum adds motion, and the date and action remain below it. There is no long animated reveal before the viewer can learn what the post announces.
| Element | Release-day update |
|---|---|
| Artist and title | Keep Luma — Low Tide |
| Release message | Change Nov 13, 2026 to Out now |
| Next action | Change Pre-save / link in bio to Listen / link in bio |
| Cover artwork | Keep the single's artwork recognizable |
The same composition exported with updated release text. This file also contains no audio track. The example date is fictional; use your own confirmed release details.
“Link in bio” is a visual instruction here. Text rendered into an MP4 is not a clickable link, and VisualizerWave does not create the pre-save destination for you. Prepare and verify the destination separately, then use the relevant profile link or posting tools for your account.
1. Decide what this announcement asks people to do
Write the message before choosing effects. You need answers to four questions: Who is it? What is the song called? When can I hear it? What should I do next?
For the example, the pre-release copy is:
Luma — Low Tide. New single, November 13, 2026. Pre-save through the link in bio.
The release-day version becomes:
Luma — Low Tide. Out now. Listen through the link in bio.
Use one main action per version. A small announcement becomes hard to scan when it asks people to pre-save, follow, comment, buy tickets, and watch another video at once. Put extra context in the post caption when it helps.
Use an actual date rather than relying only on “this Friday.” A saved or reshared clip can outlive that phrase. If availability starts at a specific time, add the time zone where it matters to your audience.
For campaign dates and delivery milestones, use the music release date calculator. This walkthrough covers making the announcement asset after you have chosen its message.
2. Choose a song section that works without the intro
Listen for a passage that communicates the song quickly: a vocal phrase, a distinctive riff, a rhythmic entrance, or a small build that reaches its payoff within the clip. The loudest waveform is not automatically the most recognizable moment.
Make a short list and audition each candidate from its proposed first frame. Avoid letting the full song's introduction supply context that the viewer will not hear in the excerpt.
| Candidate | What to listen for |
|---|---|
| Chorus or hook | Does the phrase make sense when it starts here? |
| Instrumental motif | Is the melody or groove recognizable without a vocal? |
| Build into a drop | Does the payoff arrive before the clip ends? |
Use the same approximate length while comparing candidates so a long setup does not get an unfair advantage. Then adjust the winning excerpt around its phrasing. Leave enough of the last word, chord, or decay to make the ending feel deliberate.
For example, a chorus beginning at 00:44 might give you a candidate from 00:44 to 00:56. Those are illustrative source times, not a rule to take twelve seconds from every song. Check the words and musical boundary at both ends. For bar-length calculations, the loop visualizer guide explains the timing without implying that a normal excerpt is a seamless loop.
The public examples above demonstrate the visual layout and export, rather than the musical quality of a hook. Their six-second diagnostic source selection is not a recommendation for every announcement's length.
3. Build the vertical announcement in VisualizerWave
Load your finished WAV or MP3 through Media → Upload Audio File. Use the same master intended for the release; changing versions after choosing a section can move the phrase boundaries.
Choose Vertical · 9:16 before positioning the artwork and text. The social video sizes tool helps compare placements. The worked files use 720p, which produces 720 × 1280 at this ratio. A 1080p project produces 1080 × 1920 when supported by your export setup.
Choose Release Spotlight in Templates and add your square artwork through the background's image controls. This layout keeps the cover visible over a blurred version of the image, with the reactive spectrum beneath it. The general music visualizer walkthrough explains the basic import, styling, and export workflow.
Edit the artist and track text, then add separate text elements for the date or availability message and the action. Keeping these fields separate makes the release-day version easier to update.
The example uses these settings:
| Control | Demonstrated choice |
|---|---|
| Starting template | Release Spotlight |
| Video shape / resolution | Vertical · 9:16 / 720p |
| Frame rate | 30 fps |
| Artwork background | Blur 18, Dim 0.58 |
| Spectrum | Cream #E8EDE2, gradient off, Movement 0.6 |
| Text hierarchy | Artist above artwork; title, release message, and action below the spectrum |
Treat the values as a starting point. Your artwork may need less dimming, and a different master may need gentler motion. Let the cover and release information remain the focus.
4. Make the Story version readable around app controls
Keep important text away from the top and bottom edges, and leave room on the right for controls. In this example, the main information sits in the central portion of the portrait frame. That is a composition choice, not a universal safe-area guarantee: platform interfaces and crops vary.
For an Instagram Story, leave clear space for a link sticker if it is available in your account. Add the actual sticker in Instagram after importing the saved video, then check that it does not cover the date, title, or spectrum. A painted-on button or URL in the artwork does not supply that interaction.
Preview the post in its intended placement before publishing. A frame that fits as a Story may be cropped differently in a feed or profile preview. If you also need a square or landscape announcement, reposition the layers for that version rather than assuming a center crop will preserve the message.
For broader layout choices, see the Instagram Reels visualizer workflow. Keep the announcement's artist, date, and action together when adapting the design.
5. Export the selected passage and check the saved file
Choose Export video, enable Export only a section, and enter the source range. In the current editor, In and Out accept timestamps such as 0:44 and 0:56. Confirm the displayed selection and duration before recording or rendering.
The worked export used In 0:02 / Out 0:08 from an eight-second private diagnostic source. The actual range controls and exporter produced a six-second clip. The private soundtrack check confirmed that this selection retained its expected progression; the public examples were exported without audio.
For your release, keep your song in the finished announcement and open the saved file with sound. Check that the clip starts at the chosen phrase and that the ending does not cut off a word. Export-range changes do not automatically move the player's editing selection; use Apply to selection when you want them aligned.
Start with Export 5-second test for a quick rendering check. It has its own displayed test range and does not replace your intended full section. Watch the complete selected excerpt before posting, because a short test cannot verify an ending it does not include.
Check the saved result for:
- The right artist, title, artwork, release date, and action.
- The intended audio version and source section, with a clean beginning and ending.
- Readable text at phone size during the strongest visual movement.
- Enough room for the destination platform's controls or stickers.
- A working release destination that matches the message in the video.
The examples were verified as short MP4 exports in desktop Chromium. Use the compatibility check for the formats available on your browser and device. Media processing happens locally; account and checkout services still use the network.
Keep the design ready for release day
Save a portable .visualizerwave project with the design and available media. Before making the release-day version, confirm the song is available at the destination, replace the date with Out now, and change Pre-save to Listen. Check the caption and destination as well as the pixels in the video.
Keep the same artwork, typography, and color treatment so the two posts belong to the same release. A second announcement can use another musical moment, but make that a deliberate choice rather than exporting the wrong range from the previous project.
VisualizerWave is $19 once, with unlimited exports. Build your single announcement with VisualizerWave.